The golf course was closed from August 20th to August 29th so that we could perform our semi-annual aeration process. As always, I would like to thank the management and members of our club for the patience and time that we are given. Also, I'd like to thank our assistants and equipment manager for their amazing efforts. Michael Nowicki, Duggan Cannon, Robert Andershonis, Blake Heinz, Adam Sauls and Terry Kennedy comprise one of the finest teams imaginable. These guys, supported by our tremendous staff, make Kinloch Golf Club what it is and I am sincerely grateful to work with this team.
Our greens have had a very strong season and this particular aeration was more like an aggressive venting than an aeration designed to modify the profile. The greens were aerated with 1/4" quad tines to a depth of 2.5". The greens were lightly topdressed on 3 separate occasions throughout the 10-day closure. They were rolled multiple times and lightly hand-brushed. The healing process is rapid and the greens are already putting well. Over the next ten days, as the greens fully heal and retain the appropriate smoothness and firmness, we will begin lowering heights and re-introducing our regular rolling practices. In addition to the aeration itself, our collars and interfaces were repaired where there was summer thinning. On the whole, I expect that our members will be pleased with how quickly the greens return to form. To that point, I'd like to remember the very aggressive, double, 1/2" core aeration that we perform each spring. Because this aeration is so aggressive (displacing 15% of our surface areas), our foundation for the season is set and we can be far more gentle in the summer. So, while our spring aeration is aggressive and the recovery can be trying, these methods are proving to be very effective in not only reducing summer stress, but allowing for an extended fall season.
Our tees and approaches were core aerated with 1/2" tines on 2" centers to a depth of 2.5". Once cleaned and rolled, these surfaces were topdressed with fresh sand. Once the sand was drug-in, the surfaces were rolled and mowed. In addition to the greens, any evidence of summer decline was addressed during the closure. The condition of the tees and approaches should rapidly return to form and theses areas are setup for a great fall season.
Our fairways were deep-tined on 3" centers to a depth of 7". Once the fairways were punched, they were rolled and mowed. There is almost no visible disruption to our fairway surfaces and like our tees and approaches, any summer decline from wet wilt was repaired. While our fairways are not perfect, they are in outstanding condition and poised for an awesome fall season.
Our rough and intermediate cuts are not aerated during the summer closure. Traditionally, we find that there is too much summer stress so we focused our efforts on over seeding areas of summer decline. Due to the rainfall and humidity of 2018, our rough was affected by decent amounts of summer patch and pythium. Although our spray program is well-designed and diligently applied, there are certain areas of the rough that are more sensitive than other areas. For these areas, we apply 7#'s per 1000 square feet of tall fescue seed, core aerate over top of the seed and then drag the area so that the seed finds the holes and we achieve great seed to soil contact. We are already seeing solid germination throughout the seeded areas and expect solid recovery over the next two weeks.
In addition to our summer aeration, the golf course native areas were mowed and trimmed, countless detail projects were executed and all of our landscaping received a fresh haircut. Coming out of this closure, I expect the golf course to be ready for a great fall season and look forward to seeing the activity ramp back up.
Friday, August 31, 2018
Thursday, March 29, 2018
2018 Spring Aeration
Today we are putting the final touches on our 2018 spring aeration. Originally scheduled for March 19th - March 26th, our aeration was extended through March 28th. The golf course officially reopened today.
Before I spend time on the actual process, I want to thank our club membership and leadership for the 2-day extension. The week prior, we received an inch of rain on Tuesday and several inches of snow on Wednesday. Couple the precipitation with frigid nights that were setting up long frost delays and we could not have accomplished what was accomplished without our club's support and patience. So, on behalf of our maintenance team, Thank You!
Our spring aeration has become the bedrock for our agronomic plans each season. We use this time to disturb a tremendous amount of turf. The timing of our spring aeration works well because the weather is conducive to aggressive practices without collateral injury and golf levels are generally very low so our membership experiences minimal discomfort.
Generally, I walk through each turf area (green, tee, fairway, etc.) and explain what we do and how we do it. This summary will still cover our putting surfaces, but focus more on the level of general topdressing across the property.
Our greens are first topdressed with a sizable layer of USGA spec putting green sand. This season, we were able to apply just over 1200 lbs. of sand for every 1000 square feet of surface. Once the sand is applied, our greens are deep tined with 1/2" diameter tines to a depth of 7". These holes are drilled in on 2" x 2" spacing. These deep tines not only create deep and sustainable channels for advantageous spring rooting, but fracture the soil as they move up and down. Following the deep tine, the greens are aerated with 1/2" diameter coring tines to a depth of 2.5" and a spacing of 2" x 2". Following this aeration, the same machine with the same specs makes a second pass at an alternate angle. Once the cores have dried, they are broomed to the perimeter of the green for removal. Following a second blowing, the greens are swept in three different directions to assure that all of the holes and channels are full with clean fresh sand. After the sweeping, the greens are rolled three separate times and then fertilized and watered. The first morning of re-opening, we mow the greens for the first time and we are off and going!




Before I spend time on the actual process, I want to thank our club membership and leadership for the 2-day extension. The week prior, we received an inch of rain on Tuesday and several inches of snow on Wednesday. Couple the precipitation with frigid nights that were setting up long frost delays and we could not have accomplished what was accomplished without our club's support and patience. So, on behalf of our maintenance team, Thank You!
Our spring aeration has become the bedrock for our agronomic plans each season. We use this time to disturb a tremendous amount of turf. The timing of our spring aeration works well because the weather is conducive to aggressive practices without collateral injury and golf levels are generally very low so our membership experiences minimal discomfort.
Generally, I walk through each turf area (green, tee, fairway, etc.) and explain what we do and how we do it. This summary will still cover our putting surfaces, but focus more on the level of general topdressing across the property.
Our greens are first topdressed with a sizable layer of USGA spec putting green sand. This season, we were able to apply just over 1200 lbs. of sand for every 1000 square feet of surface. Once the sand is applied, our greens are deep tined with 1/2" diameter tines to a depth of 7". These holes are drilled in on 2" x 2" spacing. These deep tines not only create deep and sustainable channels for advantageous spring rooting, but fracture the soil as they move up and down. Following the deep tine, the greens are aerated with 1/2" diameter coring tines to a depth of 2.5" and a spacing of 2" x 2". Following this aeration, the same machine with the same specs makes a second pass at an alternate angle. Once the cores have dried, they are broomed to the perimeter of the green for removal. Following a second blowing, the greens are swept in three different directions to assure that all of the holes and channels are full with clean fresh sand. After the sweeping, the greens are rolled three separate times and then fertilized and watered. The first morning of re-opening, we mow the greens for the first time and we are off and going!

This is what the finished product looks like. Many holes filled with sand. According to the ISTRC displacement chart, we displace about 15% of our surface area. Considering that the USGA recommends 20% displacement for the whole season, we accomplish 75% of that goal in one aeration.
There is no question that this is an invasive and aggressive aeration. Yet, we are not only passionate about it, but extremely excited about what it does for our turf.
As greens mature, the sandy profile that is full of air porosity, infiltration and percolation begins to "slow down" as naturally occurring organic bio-mass begins to accumulate. Simply put, as the profile matures, the plant's ability to breathe is reduced. The screenshot below, shows some data work we did on our 5th green.

But the maturity of the profile is not all bad. In fact, as the profile matures, its' ability to retain moisture and nutrients increases. Plants need food and water to survive, but they also need oxygen. So the best case scenario is a soil that drains and breathes like sand, but retains nutrients and water like top-soil.
To achieve this mythical balance, cultural processes can bridge the gap. By removing piles, literally, of old stagnate profile and replacing it with clean fresh sand, we can achieve the best of both worlds. We can maintain a profile that breathes, while still retaining nutrients and water.

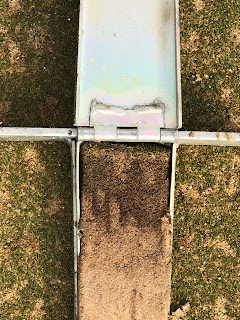
The profile shot above was taken from our 9th green. In the photo you can see the darker material and the lighter channels streaking about. These lighter channels represent the clean channels that are created through topdressing and aeration. Furthermore, if you look closely at the canopy, you can see the topdressing layer that is responsible for thatch suppression, smoothness and firmness.
Although not as aggressive, our fairways tees and approaches were verti-cut, deep tined and topdressed. This time around, we spread over 2,000,000 pounds of sand. So while it is sandy now, the dividends for the future will be immeasurable.


Monday, March 12, 2018
Select Tree Clearing and Drainage #2 Tee Complex
The following blog was put together by one of our senior assistants, Michael Nowicki.
This winter we have been working on an improvement project for the right side of 1 green and 2 tee complex. Historically this is an area of the property that often struggles due to poor drainage, lack of sunlight, and poor airflow. This is one of the most difficult micro-climates at Kinloch to maintain healthy turf throughout the season.


This winter we have been working on an improvement project for the right side of 1 green and 2 tee complex. Historically this is an area of the property that often struggles due to poor drainage, lack of sunlight, and poor airflow. This is one of the most difficult micro-climates at Kinloch to maintain healthy turf throughout the season.
Our approach to tree management at Kinloch is very unique.
We must consider the functionality of every tree i.e. is it a hazard, does it
frame the hole, or is it a reference point for the golfer. Our process for
removing trees starts with identifying the specimens that we must keep. Then we
do a walk through with the golf course architect and select the trees that can
be removed. This is a very selective process and every tree is scrutinized to
ensure that we don’t change the character of the hole, but also put ourselves
in the best position for agronomic success.
We recently applied this strategy to the right of 1 green
and 2 tees. This area experienced a lack of morning sunlight and poor airflow
that often resulted in turf decline. Much of the underbrush was thinned out
during the project but we left the focal specimen trees that frame the area.
This also opened up vistas that allow you to better view this portion of the
property.


The subsurface of 2 tees and the surrounding rough were also
in need of attention. During construction a silica based sand was used to cap
the tees. Silica sands hold more moisture than river or rock based sands. While
this method has worked great for most of the tees at Kinloch, it holds too much
water on 2 due to the aforementioned microclimate. This coupled with there
being no internal drainage in these tees meant our team had to take necessary
steps to remedy the problem.
We installed a herringbone drainage pattern in these tees.
This is very similar to the drainage design of a USGA green and is the most
efficient way to catch water and move it off a site.
The process begins by stripping the sod in the pattern that
we want to place the drain tile. These trenches are excavated to a depth of 16
inches to provide ample space for the necessary gravel, pipe, and sand. While
the trenches are being excavated we are continually checking the slope of the
trench floor to ensure we have a minimum of 2 percent fall throughout the
drainage network using a surveying tool known as a transit. Once we have
sufficient slope to move water we cover the trench floor with 2 inches of pea
gravel. Corrugated drain tile is then placed on top of the gravel and covered
up with 4 more inches of gravel. Six inches of sand similar to the silica sand
found in the tees is used to cap the project and is heavily compacted to ensure
that we do not have any future settling. Sod is then put back and rolled for a
smooth finish.


Moisture management often extends beyond our irrigation
system and how much water we apply. Thought must be given to the ability to
move excess moisture from playing surfaces along with the sunlight and airflow
needs of the turf. These projects will help us better manage moisture and
provide the world class conditioning Kinloch is known for.
Monday, November 27, 2017
Short Game Expansion Project
*The following post was written by one of our senior assistants, Mike Nowicki. Not only did Mike provide the content for this blog, but he was the point guard throughout this entire project. Many thanks to Mike and our staff for a great start to our fall improvement phase.*
As part of our ongoing
efforts to improve Kinloch and ensure that we have one of the best and most
unique practice facilities in the golfing world, the decision was made to
convert the rough located between the chipping green farthest from the
clubhouse and the big range tee to approach height bentgrass. From an agronomic
stand-point, the tightly mowed turf will better tolerate the foot traffic and
wear this area experiences throughout the season. This will mitigate the
trampled look often seen at this location. Aesthetically it provides a clean
uniform look and a sense of connectivity between our short game area and the
driving range.

I would like to take a
few moments to walk you through the construction process. We began with stripping all sod to expose the soil
underneath. Roughly two inches of top soil was removed to expose a firmer clay
subsurface and to provide room for a sand cap. Once the subsurface was exposed it
became apparent that we needed to soften the slope from the green to the tee to
provide a smoother transition and easier walk. This was accomplished by dragging
soil from the high points to the low points using our box blade and dingo
excavator. Once we were pleased with the grade a plate compactor was run over
all areas that soil was moved to guarantee that we would not experience any
settling in the future as a result of this construction.

Next we used one of our
aerifiers set up with solid tines to poke holes in the clay at a depth of three
inches. This provides deep channels for sand which is a better medium for root
growth than the red clay found on the site and will allow for deep rooting
quickly after the sod is laid. Following this a two inch sand cap was added to
the entire site. The larger particle size of sand compared to clay allows it to
resist compaction thus promoting healthier bentgrass with much better traffic
tolerance. Sand was added in two stages, we put roughly one inch down then
watered it and compacted it then did the same again. This helps stabilize the
surface for when we place the sod making it easier to have a smooth finished
product.


Finally we begin to lay sod. Lines were painted to mark where the intermediate cut would go and that was sodded first to give us an idea if we liked how everything was framed. Bentgrass was then placed inside the intermediate cut. All bentgrass was taken from the far right target green on the driving range. This turf has been at Kinloch since grow in and has evolved to withstand the difficult climate. Using turf that is acclimated to this region gives this project the best chance for success. Immediately after all sod was placed the surface was rolled to smooth out any imperfections. The final step was to replace the sod taken from the target green with sod we bought from East Coast Sod. This turf will be allowed to grow in with minimal traffic stress and will blend flawlessly with the other target greens by next season.

The new approach
measures 3500 square feet and provides a seamless transition between our short
game and driving range. It was a relatively simple project that adds even more
character to an already phenomenal practice facility.
Subscribe to:
Posts (Atom)